Here is a step-by-step guide for how to set up a Forms Support Workflow:
More details on filling out the various fields during workflow setup
When you choose Forms Support, you're presented with the following fields:
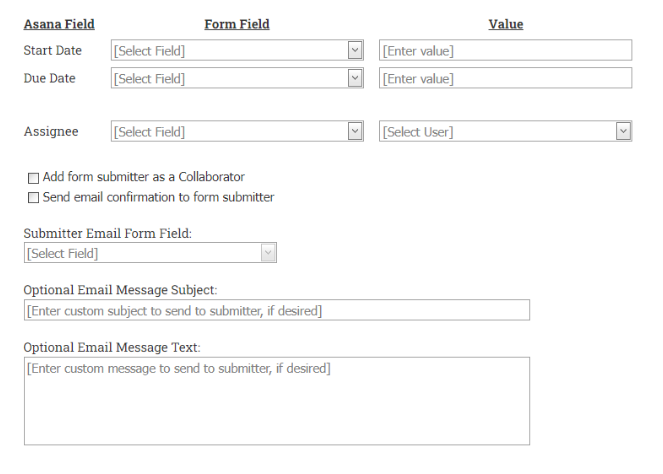
Here's what these fields mean and how to use them.
Start Date
You can choose to have a start date be set on the task which is created from the form submission. You have two options: you can have the start date be set based on the date the form is submitted, or from a date the user enters on the form. In addition, you can specify a number of days offset from this date, either forward or backward from the date.
To set a start date based on the form's submission date, leave the Form Field column blank. To set a start date based on a date the user enters into a field on the form, in the Form Field column select that field name from the Form Field dropdown list.
Regardless of whether you select a form field in the Form Field column or you leave that column blank to use the form's submission date. you can enter a number in the Value column. This number will represent a number of days offset from the operative date. This number can be a positive number, indicating a number of days after the operative date; or it can be a negative number, indicating a number of days before the operative date.
Note that the start date will never be set such that it falls on a weekend (Saturday or Sunday).
Here are some examples:

This will set the task's start date to 2 days following the form's submission date.

This will set the task's start date to 7 days prior to the date the user enters into the "Date Needed" field on the form.
Due Date
Setting a due date works identically to setting a start date, as described above.
Assignee
You can choose to have the task which is created from the form submission be assigned to a user. You have two options: you can select a specific user and always have the task assigned to that user, or you can have the assignee be set from a field on the form.
To always set the assignee to a specific user, leave the Form Field column blank and select a user from the dropdown list in the Value column. To set the assignee based on a form field, select the desired field in the Form Field column, and leave the Value column blank. If you set the assignee from a form field, that field must contain either a user's name or a user's email address. Note also that the form field can be either a text field or a dropdown list.
Add form submitter as a Collaborator
Check this box if you want Flowsana to add the submitter of the form as a Collaborator on the task that's created from the form submission. Important: If you select this option, you must set the Submitter Email Form Field entry to point to the field containing the email address of the form submitter. This is the only way that Flowsana can know who submitted the form, so that it can attempt to match that email address up with one of your Asana users. (If it doesn't find any user with the email address of the form submitter, it can't add anyone as a Collaborator.)
Send email confirmation to form submitter
Check this box if you want an email confirmation to be sent to the form submitter. If you check the box, the three fields below it are enabled.
Submitter Email Form Field
This field identifies the form field which contains the submitter's email address. This is the field whose value will be used as the recipient of the email. Normally this will be the "Email address" field which is built into every Asana form. However, it does not have to be - it can be any form field you choose from the dropdown list.
Optional Email Message Subject
If you'd like to specify a subject to be used for the confirmation message, enter it here. If you leave this field blank, the email's subject will be Confirmation of your form submission. Note that you can use Flowsana's variable substitution capability in this field as well; see Variable Substitution in Flowsana for details.
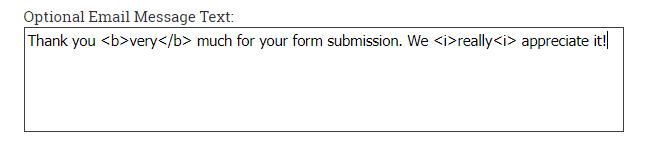
Optional Email Message Text
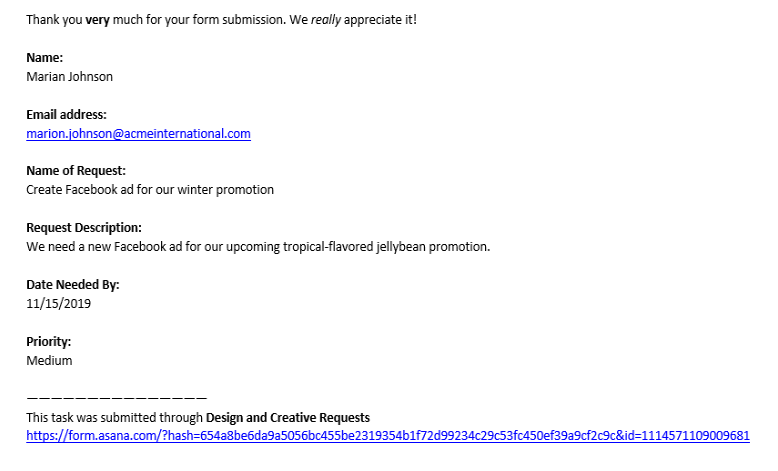
The body of the email will always contain a list of the fields and values that were submitted, so that the submitter has a record of what they submitted. In addition, if you enter some text here, it will be included at the top of the email message body, above the submission information. If you leave this field blank, the text Thank you for your form submission. will appear at the top of the email body above the submission information. You can use simple HTML tags in this message text field, such as for bold or for italics. Note that you can also use Flowsana's variable substitution capability in this field; see Variable Substitution in Flowsana for details.
Here's an example: say you enter
The resulting email which the submitter receives might look something like this (depending of course on the form fields contained on the form):
**Important Note: In order to use Flowsana's Forms Support workflow, you'll need to keep the "Copy all responses to task description" Asana form option enabled.